Marine solar panel installation
article updated: November 2022
In this article, I provide simple instructions for mounting solar panels on sailboats or powerboats.
When I first started sailing, I often found myself stranded at sea with a dead battery and no way to start my diesel engine. This is not fun or safe... I was using too much electricity and dragging my 12 volt battery down below 10 volts.
Finally, while sailing north to Alaska, I fixed this problem by installing this basic, solar panel boat system.
This boat is now docked in Mexico! With this help of this solar panel, I navigated my boat into the Sea of Cortez.
I love the idea of people generating their own energy - so I'm thrilled to see that thousands of people visit this page each year.
I installed the following set-up a few years ago, and everything is still working great (
it's now 2022 as I update this article). I update this page each year, to make sure all my recommendations are accurate and relevant.
Below, I'm writing basic 'Do-It-Yourself' instructions to install solar panels for boats.
All parts total cost me about $240, which is a great price to mount solar power on your boat. And it should be noted that I haven't skimped on quality, all the gear I use is well-respected, long-lasting stuff.
If you plan it right, you can have this project finished in one weekend
Ok, a few quick disclaimers:
- I am writing the following instructions for boat people or RV campers.
- I describe a basic set up that provides a charge onto your 12 Volt DC battery bank.
- If you want to use this system to power your home, then you'll also need an inverter to switch the 12 Volt DC electricity to 110 Volt AC.
The set up I describe is perfect for keeping batteries topped off while you're disconnected from shore power. This means that while you're out fishing, sailing or anchored out for the evening - you can run your electronics (cell-phone charger, navigation lights, stereo, cabin lights, bilge pump, depth-finder, GPS ext...) and still have enough power on your batteries to start the engine and get you home.
Ok, here's my simple DIY instructions for solar installation on a boat or an RV camper.
How to install solar panels for boats
 |
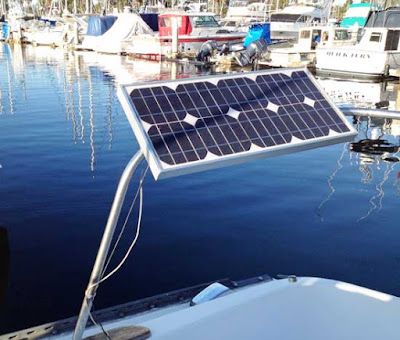
| my 30 watt solar panel on the stern railing of my boat |
Step by step guide for installing a solar panel boat system
First I list a quick summary on how to put this together. Details will follow after these instructions.
1. Mount your panel on your stern rail (see photos/details below).
2.
Attach marine grade copper wires to the panel. These are DC wires for a
12 Volt system, so you need 2 sets of wires (black and red). Black
(negative) and red (positive). If this set-up is for a RV camper then
you don't need to spend more for these marine grade wires.
3. Run the wires into the main cabin (this usually means drilling a small hole in the cockpit).
4. Attach the wires to a solar panel controller (see photo below)
5. Attach a new set of the same style of marine grade wires from the controller to your battery.
6.
The red (positive) goes on the Positive terminal, the black (negative)
goes on the Negative terminal.
7. Crack a beer and relax while the sun tops off your batteries!
-------------------------------------------------------------------------------------------------------
FAQ: What size panel should I get?
When I was planning what boat solar gear to buy, the consensus opinion was that a 30 watt panel was sufficient for my boat. My electrical needs are considered 'light'. My electronic guru friend in Seattle pointed me to the 30-Watt Solar Panel featured in the photo above.
Size-wise, it's compact (13x24 inches), which is nice, since it doesn't take up much space on the stern rail.
In regards to the power my 30 watt supplies...
If you average 5 hours of sunlight/day X 30 watts = 150 watt-hours per day.
or...
You can also think about energy in terms of current (Amps.)
A 30W panel will give you about 1.8 Amps for 5 hrs a day. That is 9 Amp hours a day.
(sunlight hours will vary based on weather conditions)
I have used my 30W panel in Seattle and San Diego, so the whole range of
sun/cloud conditions and the 30 watt output has provided enough juice
for me to use my electronics (stereo, GPS, depth-finder, cabin lights, cell phone charger, ext.) and keep my battery bank topped off.
(I've
got two 12 Volt batteries in my battery bank, a deep cycle and a starter).
FAQ: Which brand of solar panel is best?
Now, in regards to what panel to install... there's currently a bunch of high quality solar panels on the market. The industry is changing pretty fast, panel technology/efficiency keeps improving. Earlier this year, Jan 2018, as I was updating this page, I surveyed my boat and RV friends to see what panel they like best right now. Maybe 80 percent of them said they still like the Renogy panels. These panels are rugged, which is good for boats, they withstand stormy conditions. Plus you get a high quality panel (Amp. output) for the price.
If you're like me, a 'light' energy user, then go with the
Renogy 30 Watt Solar Panel
Now, that said, many boaters would fall under 'moderate' energy users. These folks would want to run some kitchen appliances, maybe some fans, perhaps a water heater, ext...
In that case, go with a 100 watt panel. Their
100 Watt Solar Panel is the preference for mid-size boats with moderate amperage needs.
Campers/RV or folks who have an off-the-grid cabin also seem to like this model.
Size-wise, the 100 watt panel is only about 45 inches by 20 inches. So, it should fit fairly well on your stern rail or RV rooftop.
And....if you want even more juice from the sun, then get a pair of these 100 watt panels and wire them together. Each panel yields 100 watts, so mount 2 for 200 watts total. Last month I helped a friend put a 100 watt on his 38 foot sailboat. We mounted it on the railing that sits on top of his canvas dodger (over the cockpit). He's happy with the output. We used the compatible
solar panel mounting bracket set to lock the panels onto his boat.
Here's the 100 watt panel on Amazon.
FAQ: Do I need a controller?
Yes. The controller is necessary for controlling the charge coming off the panel. It is a small circuit panal that is installed between the solar panel and your batteries. It enables the charge to be fed to the batteries at the right levels. It also prevents your batteries from leaking charge back out to the panel and it also prevents over-charging the battery. You need a controller, its
not optional.
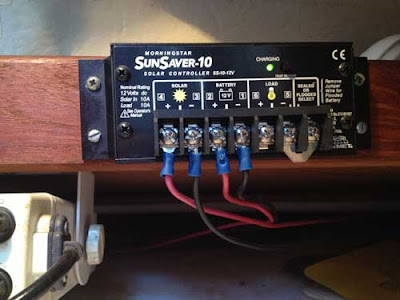
It's a simple device, but it's critical and you want a good quality controller. My guy at Fisheries Supply in Seattle told me to go with the Morningstar SunSaver-10, Charge Controller, 12V. I've had it in use for 6 years and it's worked flawlessly for me (see photo below).
There's no moving parts here, its just diodes and fixed circuits. When the sun is shining, you get a green LED light on the top of the controller (see photo). This indicates that charge is going onto the batteries.
I'm expecting this controller to last me another 10 years. As you can see, it mounts easily inside your boat with 4 stainless steel screws. I placed mine right above my chart table.
 |
| the SunSaver-10
controller mounted in my cabin |
Here's a link to that controller.
FAQ: How did you mount your panel on your stern rail?
DISCLAIMER: Every panel design will require a slightly different mount. The Renogy panels I mentioned above come with their own mounting brackets. This is probably preferred since their mounting brackets
are only 10$.

But, apparently I like to do things the hard way. I went the 'Do-it-yourself' route and built my own mounting brackets to fit my stern rail. If you want to do what I did, here's how I did it.
My panel has an aluminum rail on the perimeter. Drill holes in this rail and attach 2 aluminum flats to serve as a center mounting rail. Attach these strips of aluminum with stainless bolts and nuts. To prevent galvanic corrosion (aluminum touching steel) use plastic washers. Then, attach these white plastic rail mounts to the new aluminum flats (or something similar). The beauty of these plastic rail mounts is you can adjust their tightness on your boat's stern rail. Therefore, you can push the panel around it's axis so that the panel is facing the sun throughout the day.
 |
| the backside of my solar panel showing stern rail mounts |
FAQ: How do you wire up the panels/controller/battery?
Okay, let's assume your panel is now mounted.
Next thing is, connect the panel to the controller (the controller will be installed inside the boat).
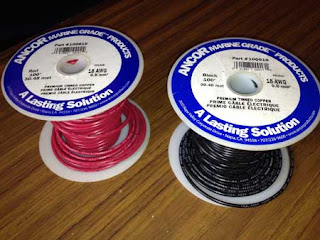
Get yourself some Marine Grade copper wire. Get at least 30 feet
of black and 30 feet of red.
These are the marine wires I use...
.
If you're doing this install in a RV or cabin, save some money and do NOT buy the marine grade wires/terminals. You don't need it, just get the regular stuff.
 |
| marine grade copper wire for 12 volt DC electronics |
Decide which terminals are best to use and attach wires to the bottom of the solar unit. There should be a contact box with a surrounding waterproof lid on the underside of the panel. To protect the circuit you can add a fuse on the positive wire, just downstream of solar panel.
Then I use plastic zip ties to snug up the wires to the rail and down to the cockpit. Then find a small hole in your cockpit (or drill a small hole) and run the wires into the interior of your boat.
 |
| zip ties snugging up the wires to keep them from getting fouled |
Okay - the rest is simple. Lead the wires to the mounted controller, then attach the incoming wires to the ' Solar + and - ' screws (See photo).
Then attach a new set of wires on the ' Battery + and - ' screws. Run the battery wires to the battery terminals.
 |
| one set of wires coming in from the panel, another set going out to the battery |
And of course, use marine grade ring terminals to fit over the battery posts. As has been pointed out to me by some experts, you also want to include a fuse on the positive wire just before it hits the positive terminal on the battery. This makes for good protection of the circuit.
 |
| incoming positive wire attaches to positive terminal... |
Well, that should finish up your solar panel boat installation project.
FAQ: How much will this whole solar panel project cost?
Solar power for boats price breakdown
Morningstar SunSaver-10, Charge Controller, 12V
about $60
aluminum rails/plastic mounts/bolts/washers/zip-ties
(or do it professional with the
Renogy mounting Z Brackets)
about $20
marine grade wire (red and black) and terminals
$30
Price-wise, you should be just around $230 and you haven't skimped on quality products.
It sure beats getting towed back to port...
Okay - Good luck with your marine solar panel installation!
Capt. Curran
Oh and by the way...
If you are unsure about your electrical diet (aka. how much energy you require), I also wrote up this
page on how best to determine your solar panel wattage requirements.
It's basically a guide to estimate how many watt/hours you'll be
requiring on a typical day or week on the water. Once you've figured out
how many watt/hours you require, you can then determine how large a
panel you'll need.
Once you have the foundation of your electrical circuit established, then you can thinking about adding on a solar panel. I also like this
review from Cruising World.
Good luck!
.JPG)
.JPG)
.JPG)
.JPG)


